Creating custom icons for an shiny new ACT you want to rollout can be somewhat frustrating, and prove tricky. Most of the time, using an icon from the ACT template examples works perfectly, but as soon as you create your own, it just doesn't show up in the UI or works in some places but not in others.
According to the documentation, you need a 16x16 bitmap image for the object tree icon, and png images of various sizes for the ribbon images. Make sure you follow the naming conventions: ACT file directory structure.
The bitmap image seems to be easier to generate, but for png images, here are a few more tips I learnt along the way:
- Make sure your icons are stored in the "/images" folder
- To make your png images, use a specialised image processor such as GIMP (free) because you need to control colors encoding and background transparency
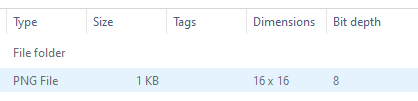
- The bit depth of you png icons should be 8 bits. If the bit depth is incorrect, the image won't show up, without any errors to tell you why. (In GIMP for example, you can use Image --> Mode --> Indexed, then in Image --> Encoding --> 8 bits Integer). I am not entirely sure if 8 bit is the maximum, but it will not work with 24 bits.
You can get windows to show you the bit depth by going into the properties of the image in the "details" tab (and add a column in your detail view to show this):
Remove your background to make sure you have transparency in your png images so it works fine with any themes
Hopefully this will help!